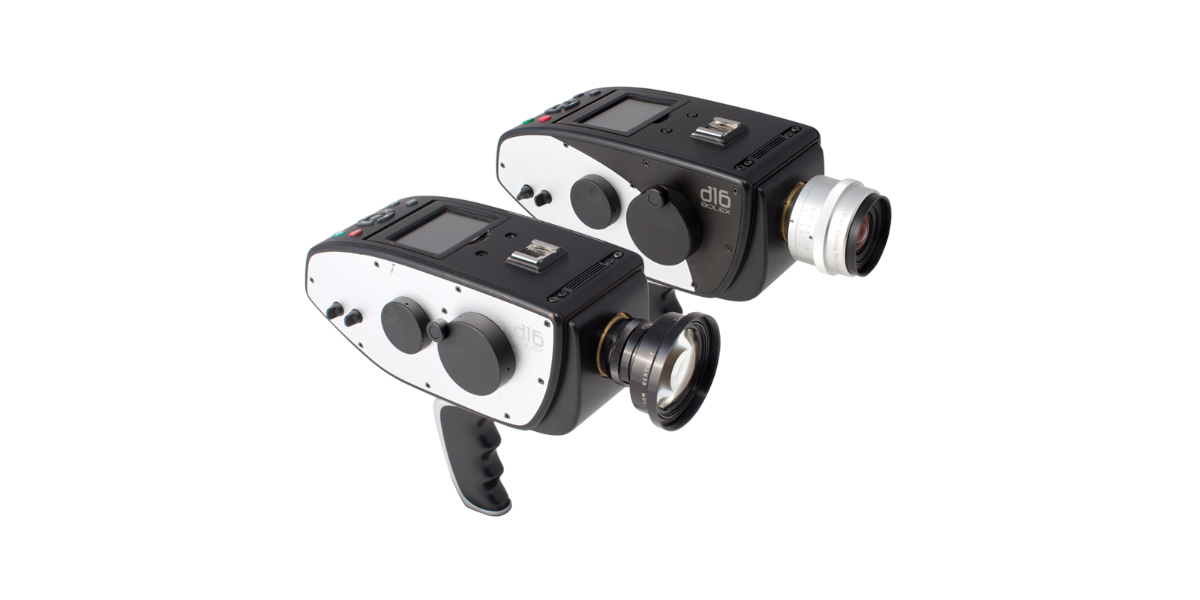
More than a year ago, two filmmakers set out on an epic challenge to make a new camera without any manufacturing experience. This was the early beginning of the Digital Bolex D16 story. It’s been really interesting watching the Digital Bolex team make their camera from start to finish on their blog. They gave everyone an inside look at the camera, posting video footage from very early versions of the sensor and the color science that went with it. The anticipation built for months as we waited to get our hands on one to try it out. That opportunity came recently when one of our employees, Michael Jenkins, got the chance to shoot some BTS for a TV show with the Digital Bolex. He got to know the D16 pretty well and wrote a production diary, mini-review, and some tips for shooting with the Digital Bolex.
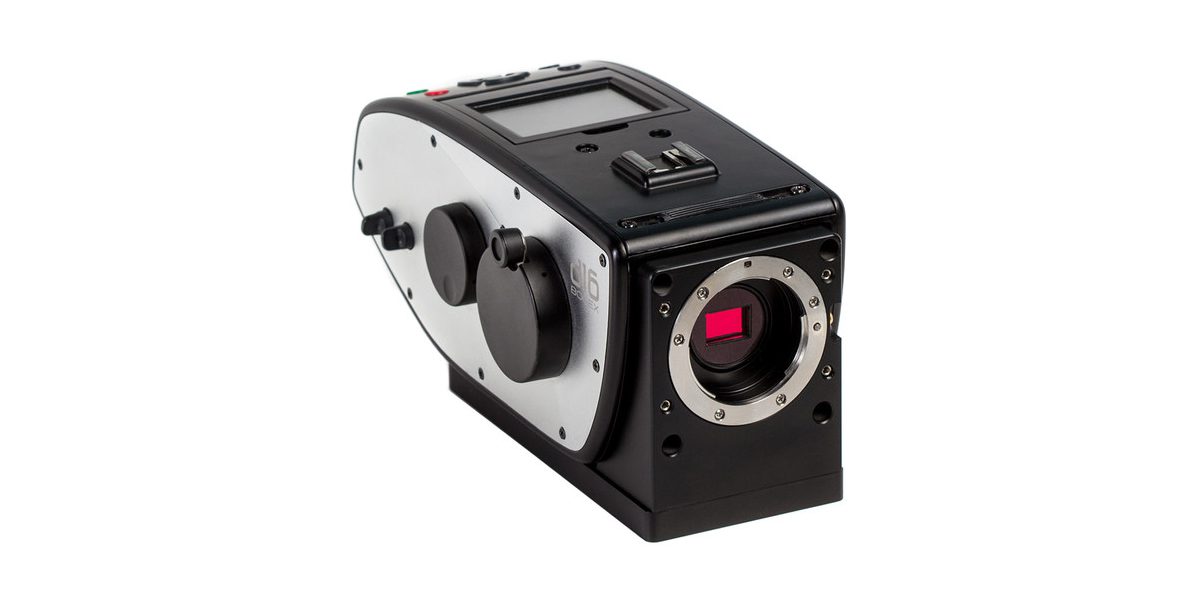
Wondering what it’s like to shoot with a Digital Bolex? It’s not like any RAW-capable camera you’ve used before. It starts with the pistol grip: this thing is made to be handheld. When you wrap your fingers around that bad boy, you instantly picture yourself as a documentary filmmaker on the streets of New York in the seventies. Pull the trigger (yes, it has a functioning trigger) and without skipping a beat the camera’s fan quiets down and the D16 begins writing 24 individual .dng files per second to the camera’s internal SSD. When you’re ready to dump this footage, you can either transfer it to two CF cards (a feature that was broken for us while testing the camera) or connect the camera directly to your PC using USB 3.0.
It all sounds so simple, and it is…up to a point.
There’s no good way to monitor your footage using the tools built-in to the camera body. The monitor Digital Bolex included is on-par with a color cell phone screen from the ’90s. Incredibly low resolution, awful colors and small size make the camera look like a cheap buy from Toys ‘R Us rather than a precision cinema tool.
You’ll definitely want to use an EVF or an external monitor to view your image. The camera includes a full-size HDMI port on the left side, as well as two balanced XLR inputs (with level knobs – a very nice touch) and 4-pin XLR in and out for power to the camera and accessories. The Zacuto Z-Finder EVF is a great companion for this camera. Attach it to a Noga arm on one of the cold shoe mounts and position it anywhere comfortable for you.
Unfortunately at this point, there’s no way to playback your footage in-camera. One way to think of it is like you’re shooting on an old-school Bolex: you have to develop your footage before you can watch it. Of course, this is a digital camera and playback is expected these days. It’s up to you to decide whether not having it is a deal-breaker.
While the images produced by this camera look incredible, working with it has been complicated. You can edit and grade it in any program that supports CinemaDNG, but the LightPost software provided by Digital Bolex is total crap. It lacks basic features like an Undo button and is very limited when it comes to color correction. I like using it to copy the footage because it checks the integrity of the data for you. It’s also extremely quick at converting to ProRes, but without being able to color the footage it’s usefulness is limited.
The image quality is truly stunning, and it’s due to the CCD sensor in the D16. It’s a little more organic than a CMOS sensor, and the only reason CMOS is so popular is that it’s a lot cheaper to produce. So kudos to Digital Bolex for choosing a sensor that is reminiscent of film and the analog video we grew up with until the recent digital age. If you have an established CinemaDNG workflow (anyone coming from a Blackmagic camera should) you won’t have any trouble doing post with this camera; anyone else might need to do some research before shooting with it. Currently, there are no options for ProRes recording in-camera, although they might be coming soon.
Digital Bolex Production Diary Day 1
Today was the first day I got to use the Digital Bolex in any capacity. Here’s a quick run-down of my thoughts so far:
It’s definitely beautiful to look at, and when kitted out with a shotgun mic and an EVF it demands attention. However it doesn’t seem obtuse; it’s as if the shotgun and EVF were designed to be part of the camera (in essence, they were. The hotshoe mounts are perfectly placed for them.) The hotshoe mount would be great for an EVF when using a shoulder rig, too. I’d like a built-in high-res EVF more than the shitty screen on top, with ¼”-20 threads all over for a monitor.
It’s really limited internally at the moment. From the lens mount to the recording formats to the display, it’s got a long way to go before it will be popular. You can’t record anything that isn’t raw. While I understand Digital Bolex’s perspective of “image quality trumps all,” the people buying or renting this camera is more likely to be short on storage space and can’t afford the file sizes generated by raw footage. It would rent better once a ProRes codec is added.
Another pain is that one of the important functions just straight-up didn’t work for me. Having never used the camera and only a cursory knowledge of its functions, I picked it up and started shooting with it. This is something a renter or new owner might do, even though someone lacking experience should always do prior research (you know how people are.)
I knew the camera could dump footage from its SSD to the CF cards, but also read online you could record directly to CF cards. I couldn’t find a menu function to enable CF card recording, but I did find Format and Transfer functionalities. I supposedly formatted the two CF cards (even though one was upside down…that’s another bullet point) after finagling the menu system. I had to back out of the stuck-yet-filled progress bar by pressing menu, and it would automatically empty and refill the progress bar before giving a completion notice.
I shot some random test footage and used up space on the SSD. I later attempted to transfer the footage from the SSD to the CF cards by using the appropriate menu items. I got a completion notice, and the SSD now read 0%. I inserted both CF cards into the card reader, and neither one was formatted. They were both labeled with 5D and 7D folders, and one still had all its images and videos on it. So now the test footage I shot was not only missing from the cards, but it had been removed from the internal SSD during the transfer process. What if I had been on a shoot and not had time to test this?
So about those CF cards. I had trouble inserting both of them, as the card slots were very tight. I inserted one right-side-up and got it in half-way, but that was it. So I turned it upside-down, and still only got it in half-way. I then tried the second card in the second slot, and it wouldn’t go in at all right-side-up. So I turned it upside-down, and it went in all the way with a little force. Nothing excessive, just normal card insertion force. Then I went back to the top card and tried it upside-down. No luck. Flipped it over, and tried again right-side-up. This time, with a little finagling, I was able to insert it all the way.
So at this point, my top card is right-side up and my bottom card is upside-down, but they’re both in all the way. I try to pull the bottom one out, and it doesn’t work. The top one is in there too. I give up and decide to see if the camera will tell me something’s wrong. That’s when I tried to format the cards, and both were supposedly successful.
Back to the live video display. At the top of this screen, one card is an outline and one is red with a small circled “x” in the center. I can’t tell if it’s something indicating a bad card or if it’s telling me which card it’s recording to. There are no instructions with this camera, either. So I go about shooting, knowing it’s shooting to the internal drive based on the percentage drop. I shoot for a while then leave it in my room and go to a bar. When I get back I try to dump the footage, to find it’s not there. It’s also wiped from the SSD, without me being asked if I wanted it to be.
-The mic and composite video ports are mislabeled in the printout included with the camera. It is supposed to tell me what everything on the body is, but obviously it got that wrong. I heard terrible static noise when I plugged into the “headphone port” and thought it was something to do with the XLR or the mic. I double-checked the printout and it confirmed I was plugged into the headphone port. On a whim, I decided to plug into the other port and suddenly heard a sound. Oops.
-The lens I got is a bit of the pain in the ass. It has a beautiful image as far as I can tell on the EVF, but it vignettes even at 1080 crop and the threads don’t quite match up with the Bolex C-mount. My lens screws on too far, so the image never focuses correctly. The interesting thing is if I unscrew the lens a bit, so the focus, iris, and zoom control markings are top-dead-center, the lens focuses perfectly (as far as I can tell, I haven’t done a distance test to confirm, or seen the footage enlarged.) So because the lens is unscrewed, it’s nearly impossible to focus, zoom, or change the aperture without moving the lens in its mount. I’ll have to tape it when I get to set.
– Holding the camera just feels right. It’s hefty but not excessive, in a way that will lend stability to your shots. Inertia is key here; it has enough mass that it doesn’t want to move without significant effort. So, it’s less shaky compared to a lightweight DSLR. The pistol grip is unreasonably comfortable and having a trigger to pull when you want to record just begs for this to be used as a run-and-gun, street-shooter camera that hasn’t been popular since the original Bolex film cameras.
– Many people will like this camera for different reasons. Soon there will be native, interchangeable lens mounts for Canon, M4/3, and PL glass. The sensor is designed by Kodak and the camera records totally uncompressed RAW, so it’s basically just direct pixel values from a high-quality CCD sensor. A talented colorist made this camera’s image look exactly like s16 film shot in the ’70s, and a talented DP made the same sensor shine like a modern film camera. The image has a unique quality afforded to it by the nature in which a CCD captures photons.
Cheers,
Michael
Digital Bolex Production Diary Days 3-5
It rained all day on Saturday (Day 2) but I still shot a couple of test clips. Sunday was a good day for usability tests, so I went around set shooting handheld video of random events. I also put the camera on a tripod and shot some test clips with pans and tilts.
Not having rolling shutter is actually a novelty these days, as so much of what we see on TV and in theaters is shot using CMOS jello-cams like the EPIC and Alexa. Purely based on the physical nature of the chips, CCD never has a rolling shutter while CMOS does. So I shot some clips of pans and whip pans, trying to coax a weird effect out of the camera. I failed.
The image held up completely under the quickest pans, and it was a delight to watch. It harkens back to the film days exquisitely, by maintaining the same physical properties that film had. It’s genius to dump RAW DNG files into a folder because it means true 24p, just like film. Combine true 24 with global shutter, and what you get are thousands of sharp, clean still images. Any of these images could be used on its own as a still frame.
Speaking of still frames, that’s how I prefer to manipulate the images that come from this camera. I open the .dng files in Adobe Camera Raw and grade just one, copying its settings to all of the other frames. Doing this allows my old laptop (mid-2009 MacBook Pro) to grade CinemaDNG quickly and painlessly, using proven tools that I am already familiar with. I can apply similar “looks” to what I have used in my still photography, and don’t need to learn a complex new color grading software to create a one-light grade.
Once I grade a .dng from the folder of .dng frames, I use Bridge to copy its settings to all the other images in the folder. I do this a few hundred frames at a time to speed up this process. A faster computer could handle 10,000+ frames simultaneously but not mine. It works, albeit slowly.
My overall workflow is still being refined, but it goes something like this:
Open LightPost (included with camera purchase, free trial on their website) software. Enter “Copy” room. Scan the SSD (it mounts like a regular USB 3.0 drive) and it will find all the clips I haven’t imported yet.
Copy the clips to a folder on my computer. The software compares the copied data to the original to ensure a proper backup. When you get the green checkmark, you can unmount the camera.
Open Bridge and navigate to the desired shot. Open a clip in Camera Raw and grade as desired. Close Photoshop and go back to Bridge. Select the graded frame and right-click, go to Develop Settings>Copy. Select a group of frames and right-click, go to Develop Settings>Paste and make sure everything is checked. This might take a while if you select too many frames for your computer to handle.
Once the Develop Settings are copied to every .dng file in that folder, you can go back to LightPost. This time go to the “Organize” room and find the clip you want to export as a ProRes or h.264 file.
After you’ve selected the desired clip, go to the “Export” room. Even though the window on the left returns to the top, your desired clip is still selected. Use the tools on the right to select the appropriate export format for your video. Everything from ProRes 4444 at 2k down to downsampled iPhone-ready h.264 files are possible. I’ve been using ProRes 422 (Proxy) to preview my files, and the exports happen fairly rapidly. A 30-second clip takes about 3 minutes to export. I haven’t experimented with other formats yet.
That’s it! You now have an edit proxy or post-production ready ProRes file you can play with! It’s been colored once, the same way FIlm receives a one-light color pass at the time of development. Different film stocks have different characteristics which are corrected for, and the D16 is no different.
So about those characters that need correcting… The D16 has a tendency to run magenta, and it can be a pain to time it out. The files come into Camera Raw with a high color temperature and up to +30 magenta already applied. I take the magenta down to 0 immediately but sometimes it needs more massaging.
I’ve also taken red out of the highlights, and if I crush the shadows sometimes they get blocky magenta patches. That’s when I add some green to the shadows, and so far doing that has successfully returned the shadows to a deep, inky black.
The look of this camera really does approach film. I created a batch action in Photoshop CC to apply a Kodak film LUT to the .dng files, and there are a lot of LUTs to choose from. It’s a little too perfect for this application, and can really make this footage look like it was shot on film. If I didn’t tell you it was digital, I bet you wouldn’t know.
This camera is perfect for BTS interviews!! It’s not a good low-light camera, so you need a powerful source to illuminate your subjects. Lucky for me, working on a film set means there are powerful lights just lying around unused at certain times of the day. I took a 1.2 HMI and bounced it into a 4×4 showcard, mixing it with daylight fill or a daylight kicker and 4×4 bounce fill.
The results are incredible. I’ve never seen BTS footage that looked as good as the actual production, yet with a completely unique quality. It was a simple as putting the actors in an unused set on our location and lighting it with an unused light. I had a shotgun mic mounted on-camera, but you could use a wireless lav and a boom mic on a C-stand if you have the resources. You can plug both directly into the camera with +48v out and independent, physical controls for levels. Take that, BMCC!
Shooting in daylight means protecting the highlights at all costs. I have a Vari-ND filter which works wonders for my image. The camera does not handle highlights well at all, and again this is because it’s a CCD sensor and the photons are literally spilling over into neighboring photosites and causing ugly artifacts. However, if you protect the highlights, you’ll see some of the richest colors and finest detail of any digital cinema camera. I was shocked at how blue my skies looked! It was that blue in real life, a day after a rainstorm, and the camera represented it immaculately.
In truth, the Vari-ND could be adding a color cast to my image, so shooting a grey card will be necessary with accessories like that. I should have done that before, but I just thought of it now >.<
By shooting a grey card I can auto white balance my image in post, using the tool available in Camera Raw (or almost any grading software). I don’t know if the results will be perfect, but it’s worth attempting. It would be prudent to shoot a color chart but I don’t have one, unfortunately.
This has been a lot of fun to play with and I look forward to using it more in the future. I’m still figuring out the best workflow, but the method I described works fairly well so far. Different raw processing software interprets the footage differently, so sometimes I can get a look I like with one software but it’s not displayed in another. Or in one instance, I just liked how Finder was previewing the .dng files, but when I opened them in any other software it looked ugly! I couldn’t figure out how to get that exact look Finder was showing me, but I did grade those files into something I liked.
Best,
Michael